1번액티비티에서 9가지 그림을 띄워놓는 액티비티를 만들고 각 그림 클릭시 투표수가 증가하여 결과보기 버튼을 누르면
2번 액티비티에서 각그림에 대한 평점과 투표수에 맞는 별점을 레이팅하는 것 .
위의 기능을 구현하기 위해 뇌피셜로 순서를 그려보았을때
일단 layout 상에서는 그림을 보여줄 imageView가 9개가 필요하고
클래스파일에서 이미지의 이름 9개를 배열로 받아줄 변수 하나
마찬가지로 각 이미지의 투표수를 담아줄 투표수 배열 변수 하나
마지막으로 각 이미지의 클릭이벤트를 걸기위해 각 이미지 고유 아이디를 가져와서 이벤트를
걸어줘야하기 때문에 받아줄 변수가 하나더 필요하다.
MPActivity
package imlsw96.helloactivity
import android.content.Intent
import androidx.appcompat.app.AppCompatActivity
import android.os.Bundle
import android.view.View
import android.widget.ImageView
import android.widget.Toast
class MPActivity : AppCompatActivity() {
var vote = IntArray(9) // 선호도 배열
var imgName = arrayOf("독서하는 소녀", "꽃장식 모자 소녀", "부채를 든 소녀",
"이레느깡 단 베르양", "잠자는 소녀", "테라스의 두 자매", "피아노 레슨", "피아노 앞의 소녀들",
"해변에서") // 이미지 이름 배열
override fun onCreate(savedInstanceState: Bundle?) {
super.onCreate(savedInstanceState)
setContentView(R.layout.activity_m_p)
title = "명화 선호도 조사"
// 이미지 클릭시 선호도 정보를 저장할 배열 선언
var iv = arrayOfNulls<ImageView>(9) // 이미지버튼 객체 배열
var ivid = arrayOf(R.id.iv1, R.id.iv2, R.id.iv3, R.id.iv4, R.id.iv5, R.id.iv6, R.id.iv7, R.id.iv8, R.id.iv9) // 이미지버튼 ID 배열
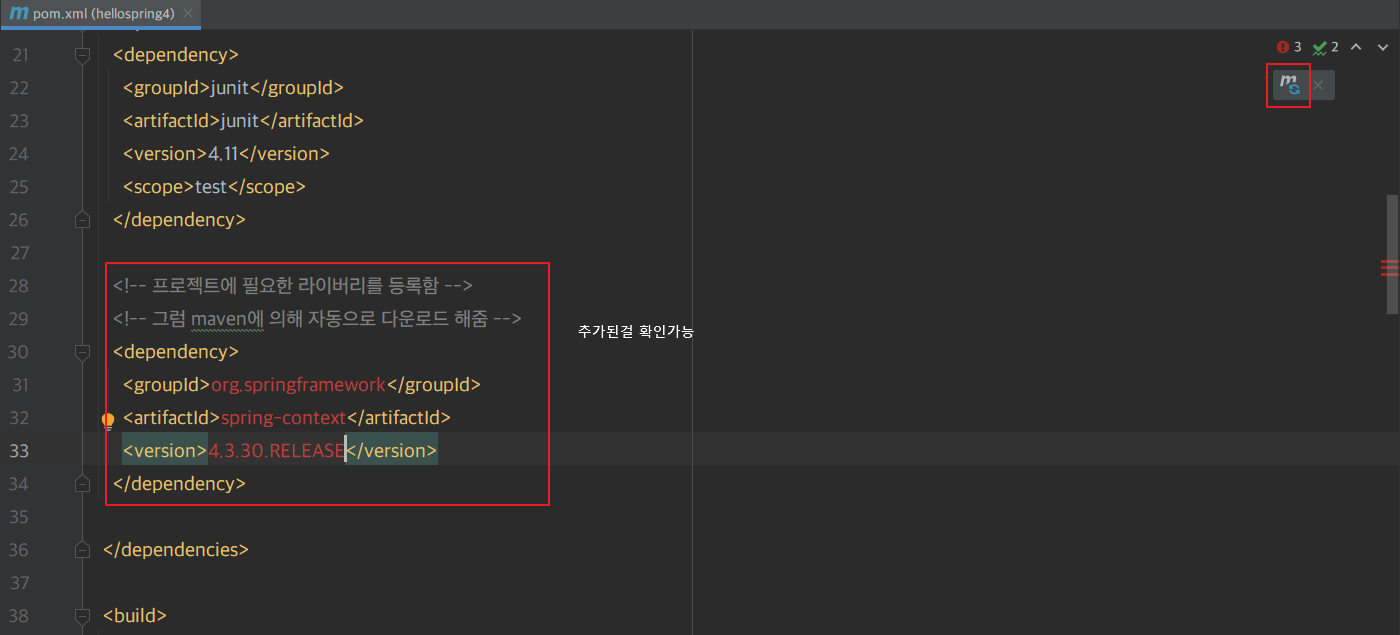
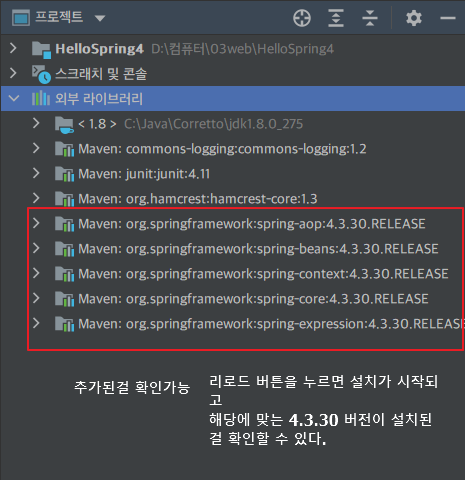
// 이미지 클릭시 각 이미지의 투표수를 증가시킴
// 또한, 해당 이미지의 이름과 누적 투표수를 Toast로 출력함함
// 따라서, 각 이미지 버튼에 클릭이벤트를 추가해 둠
for (i in ivid.indices) {
iv[i]=findViewById<ImageView>(ivid[i])
iv[i]!!.setOnClickListener{
vote[i]++
Toast.makeText(applicationContext,"${imgName[i]} 투표수 : ${vote[i]}",Toast.LENGTH_SHORT).show()
}
}
}
fun goResult(v: View) {
var intent = Intent(applicationContext, MP2Activity::class.java)
intent.putExtra("vote",vote)
intent.putExtra("imgName",imgName)
// 다른 액티비티를 실행하기 위해 인텐트 객체 생성
startActivity(intent)
// 생성한 인텐트를 실행함
}
}
MP2Activity
package imlsw96.helloactivity

import androidx.appcompat.app.AppCompatActivity
import android.os.Bundle
import android.view.View
import android.widget.RatingBar
import android.widget.TextView

class MP2Activity : AppCompatActivity() {

    override fun onCreate(savedInstanceState: Bundle?) {
        super.onCreate(savedInstanceState)
        setContentView(R.layout.activity_m_p2)
        title="선호도 조사 결과"
        // MPActivity에서 넘겨준 데이터를 담아둘 배열 변수 선언
        var rbid = arrayOf(R.id.rb1, R.id.rb2, R.id.rb3, R.id.rb4,
            R.id.rb5, R.id.rb6, R.id.rb7, R.id.rb8, R.id.rb9)

        // MPActivity에서 넘겨준 투표수를 반영할 레이팅바 객체를 저장할 배열 변수 선언
        var rbar = arrayOfNulls<RatingBar>(9)

        // 배열 변수에 실제 레이팅바 객체를 초기화함
        for(i in rbid.indices){
            rbar[i] = findViewById(rbid[i])
            rbar[i]!!.setIsIndicator(false)
            rbar[i]!!.isClickable = false
            rbar[i]!!.isClickable = false
        }


        // MPActivity에서 넘겨준 객체를 받아서 적절한 변수에 대입
        var intent = intent
        var vote = intent.getIntArrayExtra("vote")
        var imgName = intent.getStringArrayExtra("imgName")

        var tv = arrayOf(R.id.tv1,R.id.tv2,R.id.tv3,R.id.tv4,R.id.tv5,R.id.tv6,R.id.tv7,R.id.tv8,R.id.tv9)
        var realtv = arrayOfNulls<TextView>(9)
        // 초기화하 레이팅바 객체에 투표수를 반영함
        for (i in rbid.indices) {
            realtv[i] = findViewById(tv[i])
            realtv[i]!!.setText(imgName!![i])
            rbar[i]!!.setRating(vote!![i].toFloat())

        }

    }
    fun goMain(v: View) {
        finish()
    }
}
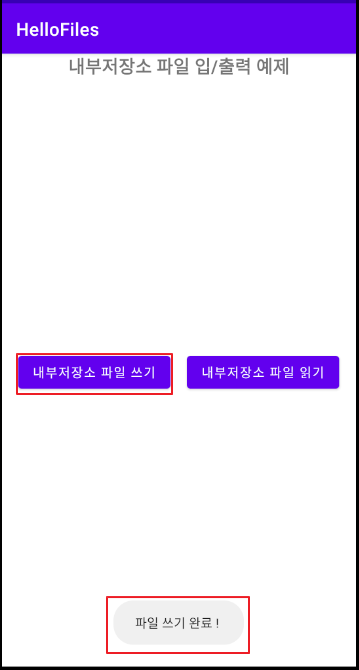
3. MainPractice내부에 FileInputStream / FileOutputStream을 이용해 파일 생성 /읽기
package imlsw96.hellofiles

import android.content.Context
import androidx.appcompat.app.AppCompatActivity
import android.os.Bundle
import android.os.Environment
import android.util.Log
import android.view.View
import android.widget.Toast
import java.io.FileInputStream
import java.io.FileOutputStream

class MainPractice : AppCompatActivity() {
    var fname = "Hello.txt"     // 생성할 파일 이름을 담을 변수
    var TAG = "MainPractice" // 로그확인을 위해 현재 액티비티 이름을 담는 변수 생성
    override fun onCreate(savedInstanceState: Bundle?) {
        super.onCreate(savedInstanceState)
        setContentView(R.layout.activity_main_practice)
    }
    // 내부 저장소 파일 쓰기 메서드
    fun internalFileWrite2 (v: View) {
        // 앱전용 쓰기 경로에 쓰기모드를 연다.
        var ofs : FileOutputStream = openFileOutput(fname, Context.MODE_PRIVATE)

        var contents = "파일에 쓸 내용을 여기다 적는다. 가나다라마바사아자차카타파하"

        ofs.write(contents.toByteArray())
        ofs.close()

        Toast.makeText(applicationContext,"파일 쓰기 완료 ! ",Toast.LENGTH_SHORT).show()

        Log.d(TAG,"파일저장 완료!")
    }

    // 내부 저장소 파일 불러오기 메서드
    fun internalFileRead2(v:View) {
        var ifs : FileInputStream = openFileInput(fname) // 파일을 열기

        var buffer = ByteArray(30) // 파일의 데이터를 30바이트를 가져와 buffer 변수에 담기

        ifs.read(buffer)
        ifs.close()

        var contents = buffer.toString(Charsets.UTF_8) // 가져온 파일내용을 UTF-8로 변환
        Toast.makeText(applicationContext, "파일내용: ${contents}", Toast.LENGTH_SHORT).show()

        Log.d(TAG,"내부저장소에서 읽은 내용은 ${contents}")
    }
}
filterNotNull이라는 함수를 사용하면 null을 제외한 나머지 요소만 다룰수 있음
+,- 연산자를 이용해서 특정 요소를 추가하거나 제거할 수 있음
fun main() {

    println("-읽기전용 리스트-")
    val names = listOf("아이린","수지","아이유")
    for(i in 0..names.size-1) println(names[i])

    println("-쓰기전용-")
    val names2 = mutableListOf("짜장면","탕수육","피자")
    names2.add("치킨") // 리스트에 "치킨" 추가
    for(i in 0..names2.size-1) println(names2.get(i))
}
package practice

fun main() {

    println("-쓰기전용-")
    val names2 = mutableListOf("짜장면","탕수육","피자")
    names2.add("치킨") // 리스트에 "치킨" 추가
    for(i in 0..names2.size-1) println(names2.get(i))

    val names2B = names2 - "짜장면" + null //짜장면을 지우고 null 값 추가
    for(i in 0..names2B.size-1) println(names2B.get(i))

    println("-null값 제외하기-")
    for(str in names2B.filterNotNull()) println(str)
}
map
자바와는 다르게 map에는 읽기전용과 수정가능한 객체등 2가지가 각각 지원
읽기전용 리스트 객체를 만들때는 mapOf라는 함수를 사용함
쓰기기능 리스트 객체를 만들대는 mutablMapOf라는 함수를 사용함
+,- 연산자를 이용해서 특정요소를 추가하거나 제거할 수 있는데
제거시 키를 지정해야 함.
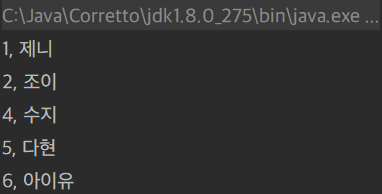
fun main() {
	val names = mutableMapOf(1 to "제니", 2 to "조이", 3 to "지수")
    names[4]="수지" 		// 키값 4의 value 수지 설정
    names.put(5,"다현") // 키값  5의 value 다현 설정
    names[3] = "로제" // 키값 3의 value "지수" -> "로제" 수정

    for (name in names) println("${name.key}, ${name.value}")

}
package practice

fun main() {
    val names = mutableMapOf(1 to "제니", 2 to "조이", 3 to "지수")
    names[4]="수지" 		// 키값 4의 value 수지 설정
    names.put(5,"다현") // 키값  5의 value 다현 설정
    names[3] = "로제" // 키값 3의 value "지수" -> "로제" 수정

	val names2 = names -3 + (6 to "아이유") // 키값 3의 value "로제" 제거 +
    										// 키값 6의 value "아이유" 추가

    for (name in names2) println("${name.key}, ${name.value}")

}
fun main() {
	var data1 = arrayOf("헤교","지현","수지") // 기본적인 배열 선언
    println("${data1[0]},${data1[1]},${data1[2]}")
}
package practice

fun main() {
    val data2 = arrayOfNulls<Int>(3) // 3개의 정수타입을 저장하는 배열 객체
    data2.set(0,1)
    data2.set(1,2)
    data2.set(2,3)

    val data3 = IntArray(3)  // 위와 동일
    data3.set(0,4)
    data3.set(1,5)
    data3.set(2,6)

    println("${data2[0]}, ${data2[1]} , ${data2[2]}")
    println("${data3.get(0)}, ${data3.get(1)} , ${data3.get(2)}")


}
fun main() {

    val data4 = intArrayOf(10,20,30) // 생성과 동시에 값 초기화
    val data5 = IntArray(3){1} // 3개의 정수를 저장하는 배열에 값 2를 3개의 배열에 넣어준다.
    val data6 = emptyArray<Int>() // 정수타입을 저장하는 빈배열 객체 배열 수가 정해지지 않는다.

            println("${data4[0]},${data4[1]},${data4[2]}")
            println("${data5[0]},${data5[1]},${data5[2]}")
            println(data6.size)

}
abstract class Terran() {
    abstract fun attack()
}

class Marine: Terran() {
    override fun attack() = println("가우스건으로 공격중입니다.")
}

class Firebat: Terran() {
    override fun attack() = println("화염방사기로 공격중입니다.")
}

fun main() {
    var m1 = Marine()
    m1.attack()
    var f1 = Firebat()
    f1.attack()
}
인터페이스
interface라는 키워드로 추상메서드로 구성된 클래스 정의
추상 메서드는 abstract라는 키워드를 사용해야 하고
추상 메서드는 반드시 자식 클래스에서 재정의를 해야 함
인터페이스 구현 시 : ' :인터페이스명 ' 형태로 사용하고 괄호는 사용하지 않음
interface Service {
abstract fun newOne()
abstract fun read()
abstract fun readOne()
abstract fun modify()
abstract fun delete()
}
object ServiceImpl : Service{
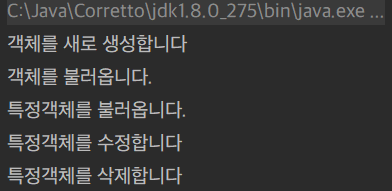
override fun newOne() = println("객체를 새로 생성합니다")
override fun read() = println("객체를 불러옵니다.")
override fun readOne() = println("특정객체를 불러옵니다.")
override fun modify() = println("특정객체를 수정합니다")
override fun delete() = println("특정객체를 삭제합니다")
}
fun main() {
// 오브젝트로 선언시 객체생성 단게 필요없이 바로 사용 가능
ServiceImpl.newOne()
ServiceImpl.read()
ServiceImpl.readOne()
ServiceImpl.modify()
ServiceImpl.delete()
}
object Person {
    var name : String =''
    var age : Int = 0

    fun print() {
    	print("${name}는 ${age}살이다.)
    }
}

fun main() {
    Person.name = "가나다"
    Person.age = 52
    Person.print()
}
Companion object
자바의 static 변수를 만들고 싶다면
companion object블록에 변수를 정의하고
객체명. 변수명으로 호출하면 됨
class Counter{
companion object{
var cnt = 0
fun add(){
cnt += 1
}
}
}
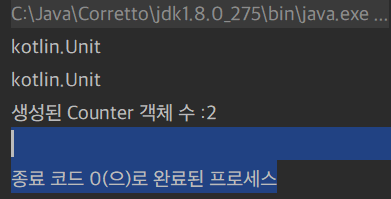
fun main() {
var a = Counter.add()
var b = Counter.add()
println(a)
println(b)
println("생성된 Counter 객체 수 :" + Counter.cnt)
}
data class
자바의 VO클래스를 만들고 싶다면
클래스 정의 시 data를 사용하면 됨
클래스 내부에 함수는 포함하면 안 됨
data class Employee(val empno : String, val fnmae: String, val lname : String)

fun main(){
  var emp1 = Employee("1","Lee","Sunwoo")
  var emp2 = Employee("2","Yoon","HyeLynn")

  println(emp1.toString())
  println(emp2.toString())
}
코틀린의 클래스 상속
모든 클래스의 조상 클래스는 Any
Any 클래스는 기본적으로 equals, toString, hashCode 등이 멤버 메서드로 구성
부모 클래스를 상속 시 ' : 부모 클래스()' 형태로 작성함
자식 클래스가 상속받으려면 부모 클래스에 open이라고 선언해야 함
부모 클래스의 메서드를 재정의하려면 함수에 open이라고 선언 해야 함
open class Parent() {
    val name : String = "Parent"

    fun sayHello() { println("Hello, World!!") }
    open fun sayBye() {println("GoodBye, World!!") }
    }

    class child() : Parent() {
        fun sayAgain() { println("Hello, Kotlin!!") }
        override fun sayBye() { println("GoodBye, Kotlin") }
        }

        fun main() {
            var child = child()

            println(child.name) // 부모클래스의 name변수 가져오기
            child.sayHello()    // 부모클래스의 sayHello() 메서드 가져오기
            child.sayAgain()    // 자식클래스의 sayAgain() 메서드 가져오기
            child.sayBye()      // 부모클래스의 sayBye() 메서드를 자식클래스에서 재정의한 sayBye() 메서드
            // 가져오기
        }
스마트 캐스팅
자손 객체를 부모 타입에 대입하는 경우 암시적 형 변환이 발생 - 이것을 스마트 캐스팅이라 함
반면, 부모 객체를 자손 타입에 대입하는 경우 명시적 형 변환이 필요 -as 키워드 사용용
var p1 : Parent = Child()  // 스마트 캐스팅
var p2 : Child = Parent() // 오류 !! 명시적 형변환이 필요하다.
var p3 : Child = Parent() as Child
fun main() {
    for(i in 1..10) print("${i} ") //1~10까지
    println("")

    for(i in 1 until 10) print("${i} ") //1~9까지
    println("")

    for(i in 1..10 step 2) print("${i} ") //1~10까지 홀수 1 2개건너뛰고 3
    println("")

    for(i in 10 downTo 1) print("${i} ") //10~1까지
    println("")

}
while :
조건이 맞는동안 반복
fun main() {
	var i = 10
    while(i>0){
    	print("${i--} ")
    }

}
Kotlin 조건식
if :
조건식이 참인 경우 지정된 연산을 수행
fun main() {

	var a = 5
    var b = 10

    if(a>b) println("a가 b보다 큽니다")
    else	println("b가 a보다 큽니다")
    println("-----------------------")
    // 조건문 실행결과를 변수의 값에도 저장이 가능하다.
    var max= if(a>b){a}
    		 else{b}
    println("큰값은 ${max}입니다")

}
when :
정수 이외의 다양한 타입을 대입해서 구분할 수 있음
fun main() {
	var num = 5
    when(num){
    1 -> print("1입니다")
    2 -> print("2입니다")
    in 3..6 -> print("어마어마한 수")
    !is Int -> print("숫자가 아님")
    else -> print("etc")
    }
}
fun main() {
    print("이름을 입력하세요 :")
    var name = readLine()
    println(name)
}
nullable
코틀린의 타입은 기본적으로 null을 사용할 수 없음 (non-nullable)
따라서, 어떤 변수에 null이 발생할 것 같으면
컴파일러가 귀신같이 알아내 컴파일 오류를 출력함
이러한 상황을 방지하려면 null safety operator 중 하나인
double-bang 연산자를 사용하면 됨
이것을 사용함으로써 비록 null이 올 수 있는 변수지만
null이 절대 할당되지 않음을 절대로 단언한다 는 의미를
컴파일러에게 알려줄 수 있음
실제로 NPE이 어디서 발생했는지 알아내는 용도로 사용함
fun main() {
	print("나이를 입력하세요 :")
    var age = readLine!!.toInt()
    print(age)
}
또한 안전 호출 연산자(?.)를 이용해서
어떤 변수의 값이 null이면 코드를 실행하고
그렇지 않은 경우 그냥 무시하고 넘어가도록 할 수 있음
fun main(){
	var name:String? = null // null을 받아들일수 있도록 변수 선언
    name = name?.capitalize()
    //만일 name이 null이라면 capitalize함수는 실행되지 않음
}
fun main() {

   print("이름을 입력하세요:")
   var name = readLine()?.ifEmpty{"혜교"} //빈값을 입력하면 혜교가 입력되게
   print("나이를 입력하세요:")
   var age = readLine()?.toIntOrNull() ?:0
   // toIntOrNull을 사용하면 Null값이 들어갈수 있게 설정을 해줌
   // 하지만 ?:0 으로 null값이면 정수 0 이 들어가게 설정함.

   println("이름은 ${name}이고 나이는 ${age}입니다.")
   println("10년 전에는 ${age-10}살이겠네요")
}
메인 부분에서는 요청 url마다 다른 파일들로 이루어져 있는데 그 파일에도 header/modal/footer
부분이 중복적으로 남아있는데 중복되는 부분은 template.jsp가 해결해주니 main부분만 남기고 다 날려 버리면 된다
예를 들어 index.jsp를 확인해 보자
<%@ page pageEncoding="utf-8" %>
<div id="main margin30">
<div class="row text-center">
<div class="col">
<h1 class="display-3 margin30">超機密 PROJECT 補完計劃</h1>
<img src="/resources/img/BrooklynNets/이미지%202021-01-13-41.png" class="margin30">
<p class="margin30">Maecenas luctus dignissim magna, vitae iaculis lorem ultricies eu. Lorem ipsum dolor sit amet, consectetur adipiscing elit. Maecenas scelerisque lectus porttitor tellus scelerisque, vel placerat ipsum pulvinar. Donec ut convallis sem. Curabitur hendrerit nulla vitae turpis viverra, at sodales lacus aliquet. Aenean id posuere neque, quis pulvinar sapien. Aliquam vestibulum maximus nibh at dapibus. Quisque feugiat egestas elementum. Nunc vulputate imperdiet augue, sed rutrum ipsum fermentum ac. Sed porttitor rhoncus tempus. Aliquam dapibus consequat orci, eu fringilla erat facilisis vel. Phasellus sagittis nulla ac sem efficitur convallis. Mauris convallis metus quis efficitur interdum. Etiam eget nunc lectus. Duis feugiat ipsum sit amet justo dignissim, sed hendrerit lectus sodales. Maecenas volutpat, nunc ut viverra lobortis, libero ipsum laoreet mauris, quis efficitur ante nisi sed ex.</p>
<div><button type="button" class="btn btn-success">지금 바로 시작하기</button></div>
</div>
</div>
<div class="row">
<div class="col-md-4 margin30">
<h2>極秘</h2>
<p>Fusce quam sem, ornare vel pulvinar id, suscipit ac leo. Mauris vel nibh in est efficitur porttitor. Etiam quis malesuada tellus. Aliquam ac mattis turpis. Proin suscipit et lorem sed ultricies. Sed augue nibh, tincidunt eget accumsan in, mollis id risus. Sed interdum ipsum sed diam convallis mattis. Fusce euismod viverra nisi, a consectetur erat vehicula nec. Pellentesque ac mi ligula. Vivamus molestie mauris quis nisl fermentum, ut luctus enim hendrerit. Duis sagittis et sapien quis posuere. Morbi ac lacinia tortor, eu sagittis quam. Donec aliquet augue et mauris elementum consectetur. Maecenas nisi tortor, euismod accumsan elit a, ornare tincidunt ligula. Vestibulum luctus lorem nec rhoncus placerat.</p>
<div><button type="button" class="btn btn-light">자세히 보기 ▸</button></div>
</div>
<div class="col-md-4 margin30">
<h2>誤謬</h2>
<p>Fusce quam sem, ornare vel pulvinar id, suscipit ac leo. Mauris vel nibh in est efficitur porttitor. Etiam quis malesuada tellus. Aliquam ac mattis turpis. Proin suscipit et lorem sed ultricies. Sed augue nibh, tincidunt eget accumsan in, mollis id risus. Sed interdum ipsum sed diam convallis mattis. Fusce euismod viverra nisi, a consectetur erat vehicula nec. Pellentesque ac mi ligula. Vivamus molestie mauris quis nisl fermentum, ut luctus enim hendrerit. Duis sagittis et sapien quis posuere. Morbi ac lacinia tortor, eu sagittis quam. Donec aliquet augue et mauris elementum consectetur. Maecenas nisi tortor, euismod accumsan elit a, ornare tincidunt ligula. Vestibulum luctus lorem nec rhoncus placerat.</p>
<div><button type="button" class="btn btn-light">자세히 보기 ▸</button></div>
</div>
<div class="col-md-4 margin30">
<h2>警告</h2>
<p>Fusce quam sem, ornare vel pulvinar id, suscipit ac leo. Mauris vel nibh in est efficitur porttitor. Etiam quis malesuada tellus. Aliquam ac mattis turpis. Proin suscipit et lorem sed ultricies. Sed augue nibh, tincidunt eget accumsan in, mollis id risus. Sed interdum ipsum sed diam convallis mattis. Fusce euismod viverra nisi, a consectetur erat vehicula nec. Pellentesque ac mi ligula. Vivamus molestie mauris quis nisl fermentum, ut luctus enim hendrerit. Duis sagittis et sapien quis posuere. Morbi ac lacinia tortor, eu sagittis quam. Donec aliquet augue et mauris elementum consectetur. Maecenas nisi tortor, euismod accumsan elit a, ornare tincidunt ligula. Vestibulum luctus lorem nec rhoncus placerat.</p>
<div><button type="button" class="btn btn-light">자세히 보기 ▸</button></div>
</div>
<div class="col-md-4 margin30">
<h2>危險</h2>
<p>Fusce quam sem, ornare vel pulvinar id, suscipit ac leo. Mauris vel nibh in est efficitur porttitor. Etiam quis malesuada tellus. Aliquam ac mattis turpis. Proin suscipit et lorem sed ultricies. Sed augue nibh, tincidunt eget accumsan in, mollis id risus. Sed interdum ipsum sed diam convallis mattis. Fusce euismod viverra nisi, a consectetur erat vehicula nec. Pellentesque ac mi ligula. Vivamus molestie mauris quis nisl fermentum, ut luctus enim hendrerit. Duis sagittis et sapien quis posuere. Morbi ac lacinia tortor, eu sagittis quam. Donec aliquet augue et mauris elementum consectetur. Maecenas nisi tortor, euismod accumsan elit a, ornare tincidunt ligula. Vestibulum luctus lorem nec rhoncus placerat.</p>
<div><button type="button" class="btn btn-light">자세히 보기 ▸</button></div>
</div>
<div class="col-md-4 margin30">
<h2>隔離</h2>
<p>Fusce quam sem, ornare vel pulvinar id, suscipit ac leo. Mauris vel nibh in est efficitur porttitor. Etiam quis malesuada tellus. Aliquam ac mattis turpis. Proin suscipit et lorem sed ultricies. Sed augue nibh, tincidunt eget accumsan in, mollis id risus. Sed interdum ipsum sed diam convallis mattis. Fusce euismod viverra nisi, a consectetur erat vehicula nec. Pellentesque ac mi ligula. Vivamus molestie mauris quis nisl fermentum, ut luctus enim hendrerit. Duis sagittis et sapien quis posuere. Morbi ac lacinia tortor, eu sagittis quam. Donec aliquet augue et mauris elementum consectetur. Maecenas nisi tortor, euismod accumsan elit a, ornare tincidunt ligula. Vestibulum luctus lorem nec rhoncus placerat.</p>
<div><button type="button" class="btn btn-light">자세히 보기 ▸</button></div>
</div>
<div class="col-md-4 margin30">
<h2>制限</h2>
<p>Fusce quam sem, ornare vel pulvinar id, suscipit ac leo. Mauris vel nibh in est efficitur porttitor. Etiam quis malesuada tellus. Aliquam ac mattis turpis. Proin suscipit et lorem sed ultricies. Sed augue nibh, tincidunt eget accumsan in, mollis id risus. Sed interdum ipsum sed diam convallis mattis. Fusce euismod viverra nisi, a consectetur erat vehicula nec. Pellentesque ac mi ligula. Vivamus molestie mauris quis nisl fermentum, ut luctus enim hendrerit. Duis sagittis et sapien quis posuere. Morbi ac lacinia tortor, eu sagittis quam. Donec aliquet augue et mauris elementum consectetur. Maecenas nisi tortor, euismod accumsan elit a, ornare tincidunt ligula. Vestibulum luctus lorem nec rhoncus placerat.</p>
<div><button type="button" class="btn btn-light">자세히 보기 ▸</button></div>
</div>
</div>
</div>
이게 현재 지금 내가 학원에서 작업하고 있는 웹페이지의 맨 처음 메인화면인 index.jsp 파일인데
보다시피 메인 부분만을 남겨놓고 나머지는 다 날려놨다
이제 기본적인 세팅은 끝나고 이 웹페이지를 맞는 url을 만들어 요청이 되면 거기에 해당하는 페이지가 나오게 하기 위해
컨트롤러 부분을 보면 된다.
IndexController
package controller;

import org.springframework.stereotype.Controller;
import org.springframework.web.bind.annotation.GetMapping;

@Controller
public class Indexcontroller {

    @GetMapping("/index")
    public String index(){
        // 타일즈 없는 뷰 호출
        // return "index";
        // => /WEB-INF/jsp/ + index + . jsp

        // 타일즐 템플릿 기반 뷰 호출
        // template.jsp <-/WEB-INF/jsp/index.jsp
        return "index.tiles";
    }
}
알아서 index.jsp 파일 경로를 찾아서 메인 부분에 template부분에 추가해줘서 띄워지게 된다.
코드를 보고 든 의문점 1
어떻게 index.tiles를 하면 찾는가?
이전에 tiles.xml에서 설정해주었다 아래 코드를 다시 봐보자.
    <!--메인영역에 보여줄 페이지를 url 요청방법에 따라 구분해 둠-->
    <!-- 메인영역을 제외한 나머지 영역은 위에서 정의한 템플릿을 참조함 -->
    <!-- url:/index.tiles => main: /index.jsp -->
    <!-- 별의 갯수에 따라 인자값이 변경가능 -->
    <definition extends="base" name="*.tiles">
        <put-attribute name="main" value="/WEB-INF/jsp/{1}.jsp"/>
    </definition>
위의 코드는 tiles.xml의 일부분이고 코드를 봐보면 우리는 블라블라. tiles로 지정을 해두면
value에 설정해준 경로로 찾아가 template의 main에 넣어준다는 걸 확인할 수 있다.
여기서 생기는 의문점 2
찾아서 template.jsp에 main부분에 필요한 부분을 채워준다는 건 확인할 수 있는데
index페이지에 템플릿이 왜 출력이 되는가?
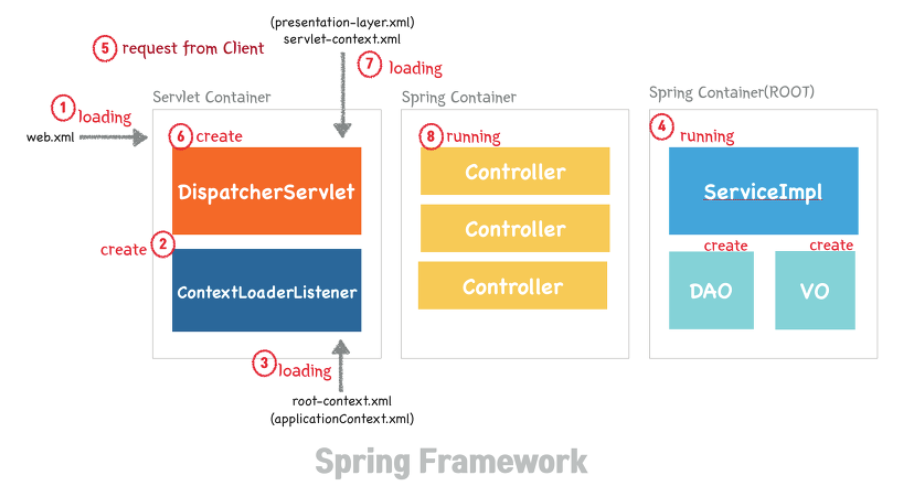
이 부분은 우리가 처음 우리가 설정해준 servlet-context파일을 다시 볼 필요가 있다.
코드를 보면 우리는 tiles.xml을 가져오고 타일즈를 뷰 리졸버로 설정해준 걸 확인할 수 있다.
그렇게 tiles.xml에는 template를 기본 base 페이지 골격을 설정해주고 main부분을
우리가 설정해준 대로 알아서 뷰 객체를 찾아서 적용시켜준다고 나는 이렇게 뇌피셜을 굴려 이해했다.
이렇게 나온 뇌피셜이 내가 수업시간에 따라한 코드를 보고 도출해낼 수 있는 합리적인 뇌피셜이라고 생각한다.
물론 구글링을 통해도 찾아보았지만 버전이 달라서 그런지 몰라도 페이지를 구현하고 xml파일의 코드 구성이 제각각이라 이해하는 데 더 어려움을 받았다. 그래도 뭔가 혼자 코드를 보며 계속 파일들을 넘나들며 도출해낸 생각들이 내 딴에는 꽤나 합리적이고 이해하는데 있어서 말의 아귀가 안 맞는다는 느낌은 들지 않아서 꽤나 만족스럽다..
틀린 부분이나 잘못 생각한 부분이 있다면 알려주세요 볼 사람이 있을지는 모르겠지만 ㅋㅋㅋㅋㅋ
위의 <% page contentType%> 이 부분은 html 문법을 사용할 수 있게 하는 태그 같다.
그리고 두 번째 @GetMapping 어노테이션인 /today 부분을 보면
ModelAndView객체를 리턴하는 걸 확인할 수 있는데 ㅋㅋㅋ 뇌피셜로 지껄여보자면
전에 올린 MVC글에서 보면
모델은애플리케이션의 정보(데이터)를 나타내며
뷰는텍스트, 체크박스 항목 등과 같은 사용자 인터페이스 요소를 나타내고, 라는 부분을
확인할 수 있는데 and 두 개로 묶은 걸 보니까 데이터와 뷰 페이지 둘 다 혼용하는 뭐 그런 객체가 아니겠는가
그렇게 코드르 분석해보면 setViewName 메서드로 today.jsp를 view페이지로 설정해주고
addObject로 객체를 넣어주는데 이름은 today요 추가할 부분은 getToday()라는 메서드이다
getToday메서드는 뭔가 하고 봤더니 아래 코드에
현재 시간을 생성하는 메서드가 아닌가
간단하게 실험하기 위해 클래스 내부에 생성해서 사용했다
이제 today.jsp 파일을 봐보자.
<%@ page contentType="text/html;charset=UTF-8"  %>
<%@ taglib uri ="http://java.sun.com/jsp/jstl/core" prefix="c"%>
<html>
<head>
    <title>오늘 날짜, 시간 출력</title>
</head>
<body>
<h1>날짜, 시간 출력</h1>
<p>${today}</p>
</body>
</html>
봐보면 <p> 태그에 ${today}를 확인할 수 있고 맨 위에 태그들 중 못 보던 taglib 태그를 볼 수 있는데
아까 컨트롤러에서 addObject로 객체를 추가한 걸 기억할 수 있는데 아마 html문에서 컨트롤러의 태그를 사용하기 위해서는
taglib 가 필요하고 추가한 객체를 사용하기 위해서는 ${} 달러표시를 통해 하는 거 같다.
많은 시간 동안 수업내용에 대해 복습하는 글을 많이 못 올렸는데
못 올린 이유에는 일단 수업 자체가 확 어려워졌다고 느껴졌다.
수업이 끝나는 기간은 정해져 있는데 해나가야 할 부분은 많다 보니
수업내용에서도 많은 부분이 자세한 설명 없이 넘어가고 수업 대부분의 시간을 선생님의 코딩을
그저 따라갔다. 이해보다는 이렇게 하니 이런 결과물이 출력이 된다 정도로만 수업이 진행되었다고
개인적으로 생각되는데 결과적으로 이런 수업을 듣고 나서 저녁시간 때 복습을 하려고
수업의 결과물을 보니 행위의 결과물들만 남아있다고 느껴졌다.
그렇게 복습을 하려고 하니 행위에 대한 이유? 저건 뭐고 이건 뭐지 하는 부분을 온전히 내가 공부해야 하는
상황이었는데 모르는 부분을 구글링을 하다 보니 모르는 걸 검색했더니 모르는 게 더 튀어나오는 상황을 겪었다.
이럴 때 내 안 좋은 습관들이 다시 나온 거 같다.
어찌어찌 모르는 걸 해결하려고는 하는데 계속 모르는 늪에 깊숙이 계속 빠지는듯한 기분에 그냥 빠져나와서
영화도 보고 운동도 하고 유튜브도 보고 머릿속에는 계속해야지 해야지 했는데 모르는 것들만 튀어나오니 손에 잡아야 한다는 걸 알지만 잡히진 않았다. 그렇게 수업을 듣고 의무적으로 들어야 하는 온라인 수업을 틀어놓으며 딴짓들을 요 며칠 했는데 당연한 이야기겠지만 위의 방법으로는 해결이 불가능하고 끝에는 포기를 하게 되는데
이 경험을 나는 이미 해봤고 포기는 하고 싶지 않아서 다시 늪에 들어가 발버둥 치려고 들어와 봤다.
복습을 하면서 음 구글링으로 이게 뭔지 정확히 아는 것도 중요한 부분이라고 생각한다. 하지만 그 정확함을 알기 위해
했던 행동들이 더욱 힘들게 했다. 그래서 일단 뇌피셜로 추측해가며 일단 복습해 나가고 그렇게 하는 와중에 오류가 생기면 다시 또 찾아보고 그렇게 나의 뇌피셜을 수정해나가는 방식으로 다시 시작해보려고 한다.
SqlSessionFactoryBuilder : 설정 파일을 통해 mybatis 객체 생성
SqlSessionFactory : sqlSession 객체 생성
SqlSession : SQL 실행 또는 트랜잭션 관리 명령 실행
Mapping 파일 : SQL문과 OR Mapping 설정
#Spring4data03.xml
<?xml version="1.0" encoding="UTF-8"?>
<beans xmlns="http://www.springframework.org/schema/beans"
       xmlns:xsi="http://www.w3.org/2001/XMLSchema-instance"
       xmlns:context="http://www.springframework.org/schema/context" xmlns:P="http://www.springframework.org/schema/c"
       xmlns:p="http://www.springframework.org/schema/p"
       xsi:schemaLocation="http://www.springframework.org/schema/beans
       http://www.springframework.org/schema/beans/spring-beans.xsd http://www.springframework.org/schema/context https://www.springframework.org/schema/context/spring-context.xsd">


    <!-- 어노테이션 기반 bean 설정-->
    <context:component-scan base-package="imlsw96.data.service, imlsw96.data.dao"/>

    <!--DBCP API : 대규모 -->
    <!--database connection pool-->
    <!--요청이 올때마다 connection 객체를 생성하는 것이 아니라-->
    <!--일정 수의 connection 객체를 미리 만들어 pool에 저장해 두고-->
    <!--요청이 발생하면 pool에서 connection 객체를 가져다 쓰게 하는 방식-->
    <!--connection 객체를 다 사용하면 바로 파괴하지 않고 pool에 반납 -->
    <bean id="dbcpDataSource" class="org.apache.commons.dbcp2.BasicDataSource"
          p:driverClassName="org.mariadb.jdbc.Driver"
        p:url ="jdbc:mariadb://mariadb.cw2h1nljbpsk.ap-northeast-2.rds.amazonaws.com:3306/playground"
        p:username ="playground"
        p:password ="playground2020"/>

    <!-- myBatis3 설정#1 -->
    <bean id="sqlSessionFactory" class="org.mybatis.spring.SqlSessionFactoryBean"
        p:dataSource-ref="dbcpDataSource"
        p:mapperLocations="classpath:mybatis3/MemberMapper.xml"/>

    <!-- myBatis3 설정#2 -->
    <bean id="sqlSession" class="org.mybatis.spring.SqlSessionTemplate">
        <constructor-arg ref="sqlSessionFactory" index="0"/>
    </bean>

    <!-- 스프링 JDBC template 정의 -->
    <bean id="jdbcTemplate" class="org.springframework.jdbc.core.JdbcTemplate">
        <property name="dataSource" ref="dbcpDataSource"/>
    </bean>

</beans>
위의 코드에서 myBatis 설정을 보면
sqlSessionFactoryBean을 이용해 스프링 컨테이너에 넣기 위해 bean으로 등록,
classpath값으로 Mapping 할 Mapper파일 위치 값을 준다.
그리고 sqlSessionTemplate를 이용해 위에 설정한 sqlSessionFactory를 참조하게 만든다.
SqlSessionFactoryBean?
mybatis에서는 SqlSession을 생성하기 위해 SqlSessionFactory를 사용
- 세션을 한번 생성하면 매핑 구문을 실행하거나 커밋 또는 롤백을 하기 위해 세션을 사용할 수 있다.
- 더 이상 필요하지 않은 상태가 되면 세션을 닫는다.
mybatis + Spring 연동 모듈(라이브러리)에서는 SqlSessionFactoryBean이 대신 사용된다.
연동 모듈을 사용하면 SqlSessionFactory를 직접 사용할 필요가 없다.
스프링 트랜잭션 설정에 따라 자동으로 커밋 혹은 롤백을 수행하고 닫히는 스레드에 안전한 SqlSession 개체가
스프링 빈에 주입될 수 있다.
SqlSessionTemplate?
SqlSessionTeamplate는 mybatis 스프링 연동 모듈의 핵심
SqlSessionTemplate는 SqlSession을 구현하고 코드에서 SqlSession을 대체하는 역할을 한다.
SqlSessionTemplate는 스레드에 안전하고 여러 개의 DAO나 매퍼에서 공유할 수 있다.
#MemberMapper.xml
<?xml version="1.0" encoding="UTF-8"?>
<!DOCTYPE mapper
        PUBLIC "-//mybatis.org//DTD Mapper 3.0//EN"
        "http://mybatis.org/dtd/mybatis-3-mapper.dtd">
<mapper namespace="member">
    <insert id="insertMember" statementType="PREPARED"
        parameterType="imlsw96.data.vo.MemberVO">
        insert into member values(#{userid},#{password},#{name},#{grade},#{point},#{regdate})
    </insert>
    <update id="updateMember" statementType="PREPARED" parameterType="imlsw96.data.vo.MemberVO">
        update member set name = #{name}, grade = #{grade}, point = #{point} where userid = #{userid}
    </update>

    <delete id="deleteMember" statementType="PREPARED"
        parameterType ="String">
        delete from member where name=#{name}
    </delete>

    <select id="selectList" statementType="PREPARED" resultType="imlsw96.data.vo.MemberVO">
        select userid, grade, regdate from member
    </select>
    <select id="selectOne" statementType="PREPARED" resultType="imlsw96.data.vo.MemberVO">
        select * from member where userid = #{userid} limit 1
    </select>
</mapper>
위의 코드를 보면 쿼리문이 들어가 있는 걸 알 수 있다.
그리고 그 태그 이름에는 SQL과 익숙한
DML인 insert, delete update와
DCL인 select가 들어가 있는 걸 확인할 수 있다.
그리고 생소할 수 있는 statementType과 resultType 그리고 parameterType 등을 추가로 설정하는 걸 볼 수 있는데
mybatis를 사용 안 하고 java.sql을 사용하여 데이터 베이스를 조회할 때를 생각해보자.
Connection으로 데이터베이스와 연결하고
PreparedStatement로 쿼리를 요청하고
ResultSet으로 쿼리 한 결과를 받아오도록 사용한다.
위의 역할들을 해주기 위해서
statementType에 쿼리문을 읽어오기 위해 PREPARED를 사용하여 쿼리문을 불러오고
parameterType은 매개변수를 설정해주는 것. DB의 칼럼명과 동일한 VO클래스로 설정해준다.
*delete 기능에서는 하나의 값만 가져오면 되기에 String
select기능을 담당할 때는 resultType을 추가로 설정하는 걸 확인할 수 있는데
resultType은 mapper 쿼리로 가져온 결과를 java의 어떤 타입으로 변환하여 반환할지 정해줘야 한다.
VO클래스의 멤버 변수들로 반환해서 읽어오게 해야 하기 때문에 VO클래스로 설정한다.
#MemberService03
package imlsw96.data.service;


import imlsw96.data.dao.MemberDAO03;
import imlsw96.data.vo.MemberVO;
import org.springframework.beans.factory.annotation.Autowired;
import org.springframework.stereotype.Service;

import java.util.List;

@Service("msrv03")
public class MemberService03 {
    @Autowired
    private MemberDAO03 mdao03;

    // 회원 정보 생성
    public String newMember(){
        String result="회원 정보 생성 실패!";
        MemberVO mvo = new MemberVO();
        mvo.setUserid("spring4");
        mvo.setPassword("spring4");
        mvo.setName("이선우");
        mvo.setGrade("Gold");
        mvo.setPoint("1000");
        mvo.setRegdate("2021-01-18 10:55:00");

        if (mdao03.insertMember(mvo)>0)
            result="회원 정보 생성 성공!";

        return result;
    }

    // 회원 정보 수정(이름, 등급, 포인트)
    public String modifyMember() {
        String result="회원정보 수정 실패";
        MemberVO mvo = new MemberVO();
        mvo.setUserid("spring4");
        mvo.setName("일지매");
        mvo.setGrade("Bronz");
        mvo.setPoint("0");

        if(mdao03.updateMember(mvo)>0)
            result="회원정보 수정 성공!";
        return result;
    }

    // 회원정보 일지매 삭제
    public String removeMember() {
        String result="회원정보 삭제 실패!";
        MemberVO mvo = new MemberVO();
        mvo.setName("abc123");

        if(mdao03.deleteMember(mvo)>0)
            result ="회원정보 삭제 성공!";
        return result;
    }

    // 회원정보 조회 (아이디,등급,가입일)
    public String readMember() {
        StringBuilder sb=new StringBuilder();
        String fmt="%10s %10s %10s\n";

        List<MemberVO> mvos = mdao03.selectMember();
        for (MemberVO m : mvos){
            sb.append(String.format(fmt,m.getUserid(),m.getGrade(),m.getRegdate() ));
        }

        return sb.toString();

    }

    // 회원정보 조회 ( 아이디로 검색)
    public String readOneMember() {
        String result = "";
        String fmt = "%10s %10s %10s %10s %10s";

        MemberVO mvo = mdao03.selectOneMember("abc123");

        result = String.format(fmt, mvo.getUserid(),mvo.getName(),mvo.getGrade(),mvo.getPoint(),mvo.getRegdate());

        return result;
    }
}
서비스 클래스의 경우 늘 짜 오듯이 자바스럽게 짜고 DB에 처리해야 할부분은 DAO에 넘겨준다.
#MemberDAO03
package imlsw96.data.dao;

import imlsw96.data.vo.MemberVO;
import org.apache.ibatis.session.SqlSession;
import org.springframework.beans.factory.annotation.Autowired;
import org.springframework.stereotype.Repository;


import java.util.List;

@Repository("mdao03")
public class MemberDAO03 {
    @Autowired
    private SqlSession sqlSession;
    // mybatis 사용하기 위해
    // SqlSession 객체를 MemberDAO03에 DI함


    public int insertMember(MemberVO mvo) {

        return sqlSession.insert("member.insertMember",mvo);
    }


    public int updateMember(MemberVO mvo) {

        return sqlSession.update("member.updateMember",mvo);

    }

    public int deleteMember(MemberVO mvo) {

        return sqlSession.update("member.deleteMember",mvo);
    }


    public List<MemberVO> selectMember() {


        return sqlSession.selectList("member.selectList");
    }


    public MemberVO selectOneMember(String userid) {

        return sqlSession.selectOne("member.selectOne",userid);
   }


    }
DAO클래스의 코드들을 보면 확연히 깔끔해진 걸 확인할 수 있다.
Mapper에 쿼리문등 설정을 해주고 DAO클래스에서는 sqlSession 객체를 생성해서
package imlsw96.basic;

import imlsw96.product.ProductService01;


public class HelloSpring4App08 {

    public static void main(String[] args) {
        ProductService01 ps = new ProductService01 ();
        ps. newProduct();
    }
#ProductService01
package imlsw96.product;

public class ProductService01 {

    // 상품등록 기능을 수행하는 메서드
    public void newProduct() {
        System.out.println("새로운 상품을 등록합니다!");


        ProductVO pvo = new ProductVO();
        pvo.setPname("수지로션");
        pvo.setPrice(35000);

        // 입력받은 상품 정보에 영속성을 부여하기 위해 DAO 호출
        // 마찬가지로 new 연산자로 해당 객체를 생성하고
        // insertProduct 메서드 호출함
        ProductDAO01 pdao = new ProductDAO01();
        pdao.insertProduct(pvo);

        System.out.println("새로운 상품이 등로되었습니다 !");
    }
}
#ProductDAO01
package imlsw96.product;

public class ProductDAO01 {
    public void insertProduct(ProductVO pvo) {
        System.out.printf(
                "입력하신 %s가 성공적으로 저장되었어요\n",pvo.getPname() );
    }
}
#ProductVO
package imlsw96.product;

public class ProductVO {
    private String pname;
    private  int price;
    public void setPname(String pname) {
        this.pname = pname;
    }

    public void setPrice(int price) {
        this.price = price;
    }

    public String getPname() {
        return pname;
    }

    public int getPrice() {
        return price;
    }
}
package imlsw96.basic;

import imlsw96.product.ProductService02;
import imlsw96.product.ProductService02Impl;


public class HelloSpring4App09 {


    public static void main(String[] args) {
        ProductService02 ps = new ProductService02Impl();
        ps. newProduct();
    }
}
package imlsw96.product;

public class ProductService02Impl implements ProductService02{

    // 상품등록 기능을 수행하는 메서드
    @Override
    public void newProduct() {
        System.out.println("새로운 상품을 등록합니다!");


        ProductVO pvo = new ProductVO();
        pvo.setPname("수지로션");
        pvo.setPrice(35000);

        // 입력받은 상품 정보에 영속성을 부여하기 위해 DAO 호출
        // 영속성이란 ? : 데이터가 영구히 저장되게끔
        // 마찬가지로 new 연산자로 해당 객체를 생성하고
        // insertProduct 메서드 호출함
        ProductDAO02 pdao = new ProductDAO02Impl();
        pdao.insertProduct(pvo);

        System.out.println("새로운 상품이 등로되었습니다 !");
    }
}
package imlsw96.product;

public class ProductDAO02Impl implements ProductDAO02 {

    @Override
    public void insertProduct(ProductVO pvo) {
        System.out.printf(
                "입력하신 %s가 성공적으로 저장되었어요\n",pvo.getPname() );
    }
}
#VO클래스 위와 동일
인터페이스만 추가했고 Chapter 01의 경우와 크게 다르지 않다.
Service와 DAO 클래스를 인터페이스 클래스를 만들고 그걸 상속시킨 Impl 클래스들을 객체 생성해서
클래스 호출 패턴 글에서 06번 예제를 보면 알 수 있듯이. xml파일에 스프링 컨테이너가 미리 만들어놓을 객체를
설정해준다. ps03이라는 id를 가지는 ProductService03 Impl 서비스 객체를 만들고
서비스 클래스에서 DAO클래스로 넘겨줘야 하니 DAO클래스 객체가 필요 그래서 pdao라는 이름을 가진 property속성을
추가해주고 pdao속성은 pdao라는 id를 가진 DAO03 Impl 객체를 bean을 통해 만들어준다.
#HelloSpring4 App10
package imlsw96.basic;

import imlsw96.product.ProductService02;
import imlsw96.product.ProductService02Impl;
import imlsw96.product.ProductService03Impl;
import org.springframework.context.ApplicationContext;
import org.springframework.context.support.ClassPathXmlApplicationContext;


public class HelloSpring4App10 {

 public static void main(String[] args) {
        ApplicationContext ctx = new ClassPathXmlApplicationContext("product.xml");

        ProductService02 ps = (ProductService03Impl) ctx.getBean("ps03");

        // ProductDAO03 pdao= new ProductDAO03Impl()
        // ps.setPdao(pdao);
        // ProductDAO03에 대한 객체를 사용하려면 new 연산자로 객체를 생성해야 하는데
        // 이러한 작업을 스프링 컨테이너에 의해 대신 처리함
        // 단, bean.xml에 이러한 내용이 미리 선언되어 있어야 함
        //
        ps.newProduct();
    }
}
메인 메서드에서 ApplicationContext를 이용해서 product.xml을 읽어와? 객체 생성을 스프링컨테이너에게 맡기고
객체생성 코드를 생략할 수 있다. getBean을 이용하여
#ProductService , ProductDAO 인터페이스는 위 Chapter와 동일
# ProductService03 Impl, ProductDAO03 Impl
package imlsw96.product;

public class ProductService03Impl implements ProductService02{

    private ProductDAO02 pdao;

    public void setPdao(ProductDAO02 pdao) {
        this.pdao = pdao;
    }

    // 상품등록 기능을 수행하는 메서드
    @Override
    public void newProduct() {
        System.out.println("새로운 상품을 등록합니다!");


        ProductVO pvo = new ProductVO();
        pvo.setPname("수지로션");
        pvo.setPrice(35000);

        // 입력받은 상품 정보에 영속성을 부여하기 위해 DAO 호출
        // 영속성이란 ? : 데이터가 영구히 저장되게끔
        // 마찬가지로 new 연산자로 해당 객체를 생성하고
        // insertProduct 메서드 호출함
       // ProductDAO02 pdao = new ProductDAO03Impl();
        pdao.insertProduct(pvo);

        System.out.println("새로운 상품이 등로되었습니다 !");
    }
}
인터페이스 기반으로 코드 작성 스프링에 의해 객체를 주입받는 방법은 setter를 이용하거나 생성자를 이용하는 것
Chapter 04 스프링 어노테이션 사용해서 만들어보기.
어노테이션을 사용해서 클래스를 만들기 전에 어노테이션(Annotation)에 간단히 알아보고 가자.
1. Annotation이란?
@를 이용한 주석, 자바 코드에 주석을 달아 특별한 의미를 부여한 것.
메타데이터(실제 데이터가 아닌 Data를 위한 데이터)라고도 불리고 JDK5부터 등장
컴파일러가 특정 오류를 억제하도록 지시하는 것과 같이 프로그램 코드의 일부가 아닌
프로그램에 관한 데이터를 제공, 코드에 정보를 추가하는 정형화된 방법.
2. Annotation이 나온 이유
프로그램의 규모가 방대해지면서 XML이 가지는 설정 정보의 양이 많아지기 때문
-Annotation을 사용하면 직관적인 메타데이터의 설정 가능하다 소스코드와 함께 쓰이기 때문에
3. Annotation 사용 시 장점 :
데이터에 대한 유효성 검사 조건을 어노테이션을 사용하여 Model 클래스에 직접 명시함으로써
해당 데이터들에 대한 유효 조건을 쉽게 파악할 수 있게 되며 , 코드의 양도 줄어들게 된다.
기존과 같이 작성했더라면 주석 부분처럼 작성해야겠지만 component-scan을 이용하면 지정 패키지 (경로)에 있는 모든 클래스를 가져올 수 있다.
보다시피 DAO03 Impl과 Service03 Impl파일을 가져온다.
#ProductDAO03 Impl
package imlsw96.product.anno;

import imlsw96.product.ProductDAO02;
import imlsw96.product.ProductVO;
import org.springframework.stereotype.Component;

@Component("pdao")
public class ProductDAO03Impl implements ProductDAO02 {

   @Override
    public void insertProduct(ProductVO pvo) {
        System.out.printf(
                "입력하신 %s가 성공적으로 저장되었어요\n",pvo.getPname() );
    }
}
#Service03 Impl
package imlsw96.product.anno;

import imlsw96.product.ProductDAO02;
import imlsw96.product.ProductService02;
import imlsw96.product.ProductVO;
import org.springframework.beans.factory.annotation.Autowired;
import org.springframework.stereotype.Component;

@Component("ps03")
public class ProductService03Impl implements ProductService02 {

    @Autowired
    private ProductDAO02 pdao;
    // 이전 예제에서는 setter 메서드를 통해 DI 되었음
    // 지금은 어노테이션을 선언해서 setter 메서드 정의 없이
    // DI 받음

//    public void setPdao(ProductDAO02 pdao) {
//        this.pdao = pdao;
//    }

    // 상품등록 기능을 수행하는 메서드
    @Override
    public void newProduct() {
        System.out.println("새로운 상품을 등록합니다!");


        ProductVO pvo = new ProductVO();
        pvo.setPname("수지로션");
        pvo.setPrice(35000);

        // 입력받은 상품 정보에 영속성을 부여하기 위해 DAO 호출
        // 영속성이란 ? : 데이터가 영구히 저장되게끔
        // 마찬가지로 new 연산자로 해당 객체를 생성하고
        // insertProduct 메서드 호출함
       // ProductDAO02 pdao = new ProductDAO03Impl();
        pdao.insertProduct(pvo);

        System.out.println("새로운 상품이 등로되었습니다 !");
    }
}
#HelloSpring4 App12
package imlsw96.basic;


import imlsw96.product.ProductService02;
import imlsw96.product.anno.ProductService03Impl;
import org.springframework.context.ApplicationContext;
import org.springframework.context.support.ClassPathXmlApplicationContext;


public class HelloSpring4App12 {
    // 상품 등록 프로그램v4
    // HelloSpring4App10 -> ProductService02 -> ProductDAO02

    // Main 클래스에서 상품등록기능을 실행하기 위해
    // 스프링 컨테이너가 만들어준 객체를 이용함
    // 이때 setter 메서드를 이용해서 객체를 주입받음
    // bean 설정 대신 간단하게 어노테이션으로 DI를 함
    //


    public static void main(String[] args) {
        ApplicationContext ctx = new ClassPathXmlApplicationContext("product12.xml");

        ProductService02 ps = (ProductService03Impl) ctx.getBean("ps03");

        ps.newProduct();
    }
}
보다시피 xml파일의 코드가 간단해졌고 어노테이션을 달아 다른 클래스의 코드도 전보다 좀 더? 나아진 걸 확인할 수 있다.
public class HelloSpring4App01 {
    public static void main(String[] args) {
        //System.out.println("Hello, World!!");
        HelloSpring4App01 app = new HelloSpring4App01(); //2b
        app.sayHello("sunwoo!");

    }

    private void sayHello(String msg) { //2a
        System.out.println("Hello," + msg);
    }
}
2. 두 번째 사례
외부 클래스를 통해 인사말을 구현하는 기능 구현
인삿말을 출력하려면 외부 클래스를 객체화한 뒤
sayHello 메서드 호출
한편 HelloSpring4 App02을 실행하려면
HelloSpring4 Bean02라는 클래스가 있어야 함
즉, 클래스 간의 의존성이 생긴다
의존성이 커짐으로 발생하는 부수적인 단점은
코드 변경 시 그것과 연관되는 다른 클래스에도 영향을 미침
유지보수의 범위가 넓어짐
해결책 : 인터페이스를 도입해서 객체 간 의존성을 낮춤
// HelloSpring4 App02
public class HelloSpring4App02 {
    public static void main(String[] args) {
        HelloSpring4Bean02 bean = new HelloSpring4Bean02();
        bean.sayHello("Sunwoo!!!");
    }
}
// HelloSpring4 Bean02
package imlsw96.bean;

public class HelloSpring4Bean02 {

    public void sayHello(String world) {
        System.out.println("Hello," + world);
    }
}
03. 세 번째 사례
인사말을 한국어, 영어, 일본어로 출력하도록 기능을 개선.
해당 기능을 제각각의 이름으로 호출하는 경우
지나치게 복잡해지고 기능에 따라 이름을
일일이 외워야 하는 불편함이 존재함
해결 : 인터페이스를 도입해서 객체 간 의존성을 낮춤
public class HelloSpring4App03 {


    public static void main(String[] args) {
        HelloSpring4Bean03 bean = new HelloSpring4Bean03();
        bean.sayHelloKor("스프링4 !!!");
        bean.sayHelloEng("spring4 !!!");
        bean.sayHelloJpn("일본어 !!!");
    }
}
package imlsw96.bean;
public class HelloSpring4Bean03 {
// 다양한 언어로 인삿말을 출력하는 메서드
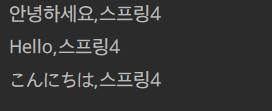
public void sayHelloKor(String world) {
System.out.println("안녕하세요," + world);
}
public void sayHelloEng(String world) {
System.out.println("Hello," + world);
}
public void sayHelloJpn(String world) {
System.out.println("おはようございます," + world);
}
}
4. 네 번째 사례
인터페이스를 도입
확장성이 높고 유연한 코드를 작성할 수 있음
또한, 객체 간의 tightly coupled도 피할 수 있음
03번의 예로 객체 생성할 때 그에 맞는 클래스명, 다른 변수명으로 객체를 생성해서 사용해야 하지만
객체 간의 의존성도 낮출 수 있음
하지만, new 연산자로 객체를 생성하는 코드가 노출
다시 말해, HelloSpring4 Bean04는
HelloSpirng4 Bean04 Kor.HelloSpirng4 Bean04 Eng, HelloSpirng4 Bean04 Jpn에 의존적이라는 의미
해결 : factory 패턴을 이용해서
객체 생성을 전담하는 클래스를 만들어
객체 생성과정을 캡슐화함
package imlsw96.basic;


import imlsw96.bean.*;

public class HelloSpring4App04 {


    public static void main(String[] args) {
        HelloSpring4Bean04 bean = new HelloSpring4Bean04Kor();
        bean.sayHello("스프링4");

        bean = new HelloSpring4Bean04Eng();
        bean.sayHello("Spring4");

        bean = new HelloSpring4Bean04Jpn();
        bean.sayHello("Spring4");
    }
}
package imlsw96.bean;

public interface HelloSpring4Bean04 {
    // 다국어 인삿말을 위해 동일한 인터페이스를 정의
    void sayHello( String msg );
}
package imlsw96.bean;

public class HelloSpring4Bean04Eng implements HelloSpring4Bean04 {

    // 영어로 인삿말을 출력하는 메서드
    @Override
    public void sayHello(String world) {
        System.out.println("Hello," + world);
    }


}
package imlsw96.bean;

public class HelloSpring4Bean04Jpn implements HelloSpring4Bean04 {

    // 일본어로 인삿말을 출력하는 메서드
    @Override
    public void sayHello(String world) {
        System.out.println("こんにちは," + world);
    }


}
package imlsw96.bean;

public class HelloSpring4Bean04Kor implements HelloSpring4Bean04 {

    // 한국어HelloSpring4Bean03로 인삿말을 출력하는 메서드
    @Override
    public void sayHello(String world) {
        System.out.println("안녕하세요," + world);
    }


}
5. 다섯 번째 사례
factory 패턴을 이용해서 객체 생성을 캡슐화함
한편, 매개변수를 이용해서 생성할 객체를 취사선택함
객체생성을 팩토리 패턴으로 구현해야 함
따라서, 개발자가 신경 써야 할 부분이 은연중에 추가됨
즉, 비즈니스 로직 코드 작성하는 것도 버거운데
객체 생성 관련 클래스로 따로 작성하는 것은 더욱 힒듬
해결 : 객체 생성 부분은 외부의 힘을 빌림
IoC 컨테이너가 객체를 생성하고 그것을 주입 (inject) 받음
import imlsw96.bean.*;

public class HelloSpring4App05 {

    public static void main(String[] args) {
        HelloSpring4Bean05Factory.create("kor").sayHello("스프링4");
        HelloSpring4Bean05Factory.create("eng").sayHello("스프링4");
        HelloSpring4Bean05Factory.create("jpn").sayHello("스프링4");
    }
}
package imlsw96.bean;

public class HelloSpring4Bean05Factory {


    // 인삿말을 출력하는 객체를 생성하는 create 메서드 정의
    // type이라는 매개변수를 통해 출력할 인삿말의 유형을 선택함

    public static HelloSpring4Bean04 create(String type){
        HelloSpring4Bean04 bean = null;

        if (type.equalsIgnoreCase("kor"))
            bean = new HelloSpring4Bean04Kor();
        else if (type.equalsIgnoreCase("eng"))
            bean = new HelloSpring4Bean04Eng();
        else if (type.equalsIgnoreCase("jpn"))
            bean = new HelloSpring4Bean04Jpn();

        return bean;
    }

}
이 부분은 보면서 헷갈릴 수도 있어서 그냥 필자의 뇌피셜을 싸질러보면
위의 4번째 사례에서 만들어놓은 interface타입을 return 하는 05 Factory 클래스에 create라는 이름의 메서드를 생성해서
인자 값 검사를 해줘서 인터페이스를 상속받아 kor , eng, jpn클래스를 인스턴스화를 시켜주고 그 값을 넘겨준다.
그러고 메인 메서드가 있는 App05번에 보면 Factory클래스에 생성해놓은 메서드를 이용하여 객체 생성 부분을 캡슐화해서 나라별로 언어를 실행하는 걸 확인할 수 있다.
6. 스프링 프레임워크를 사용하는 첫번째 사례
05번의 에제를 보면 factory 패턴을 이용해서 객체를 생성하는 코드를 작성했었다.
하지만 스프링프레임워크를 사용하면 이러한 과정은 필요 없다.
스프링 프레임워크를 이용한 개발의 필수요건은
인터페이스 기반 설계!
실행 원리
예제를 보면 알 수 있듯 객체 생성 시 NEW연산자를 사용하지 않고
스프링이 대신 객체를 생성하고 프로그램에서는 DI를 통해 사용함
bean.xml에 스프링 컨테이너가 미리 생성해둬야 할 객체와 이름을 정의해 둠
프로그램이 시작되면 bean06.xml에 작성한 객체 정보를 스프링 컨테이너가 읽어서 객체를 만들어 둠
BeanFactory에서 getBean 메서드로 해당 객체를 가져와서 HelloSpring4 Bean04 타입의 변수에 주입
<!doctype html>
<html lang="ko">
<head>
<meta charset="utf-8">
<meta name="viewport" content="width=device-width, initial-scale=1, shrink-to-fit=no">
<link rel="stylesheet" href="./css/bootstrap.min.css" integrity="sha384-TX8t27EcRE3e/ihU7zmQxVncDAy5uIKz4rEkgIXeMed4M0jlfIDPvg6uqKI2xXr2" crossorigin="anonymous">
<link rel="stylesheet" href="https://cdn.jsdelivr.net/npm/bootstrap-icons@1.3.0/font/bootstrap-icons.css">
<title>세미프로젝트v1 내가쓴버전</title>
<style>
.fatdiv { padding: 24px; }
.margin30 { margin: 30px 0; }
.padding30 {padding :30px 0;}
.indeximg {height: 300px;}
</style>
</head>
<body>
<div class="container bg-light">
<header class="row ">
<div class="col-5">
<h2 class=" font-weight-bold"><img src="./img/BrooklynNets/이미지%202021-01-13-41.png" style="width: 50px; height: 50px;">Brooklyn Nets </h2>
</div>
<div class="col-7 text-right">
<h2>
<button type="button" class="btn btn-danger"
data-toggle="modal" data-target="#loginmodal">로그인</button>
<button type="button" class="btn btn-primary">회원가입</button>
</h2>
</div>
</header>
<div class="nav navbar-expand navbar-dark bg-dark row">
<ul class="navbar-nav nav-fill w-100">
<li class="nav-item"><a class="nav-link" href="index.html">프로젝트 소개</a></li>
<li class="nav-item"><a class="nav-link" href="#">회원가입</a></li>
<li class="nav-item"><a class="nav-link" href="#">게시판</a></li>
<li class="nav-item"><a class="nav-link" href="#">자료실</a></li>
<li class="nav-item"><a class="nav-link" href="#">갤러리</a></li>
<li class="nav-item"><a class="nav-link" href="#">관리자</a></li>
</ul>
</div>
<div class="main ">
<div class="row text-center padding30">
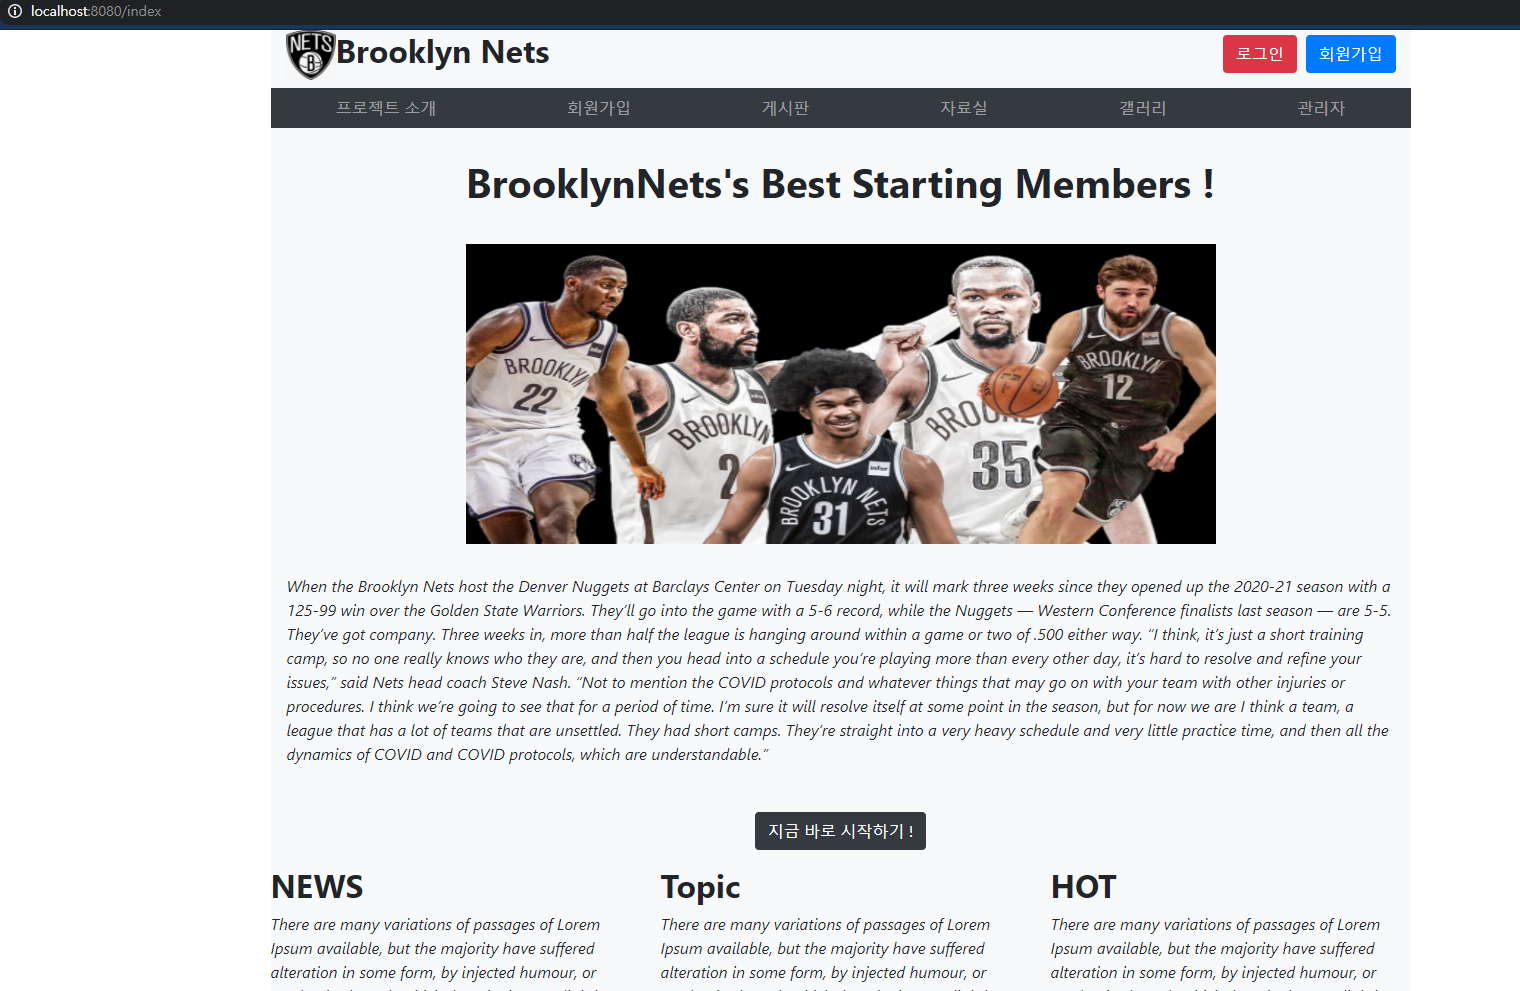
<h1 class="col-12 font-weight-bold display-4">BrooklynNets's Best Starting Members !</h1>
</div>
<div class="row justify-content-center">
<img class="col-8 indeximg " src="./img/BrooklynNets/Brooklyn_Nets.jpg">
</div>
<div class="">
<p class="padding30 font-italic">When the Brooklyn Nets host the Denver Nuggets at Barclays Center on Tuesday night, it will mark three weeks since they opened up the 2020-21 season with a 125-99 win over the Golden State Warriors.
They’ll go into the game with a 5-6 record, while the Nuggets — Western Conference finalists last season — are 5-5. They’ve got company. Three weeks in, more than half the league is hanging around within a game or two of .500 either way.
“I think, it’s just a short training camp, so no one really knows who they are, and then you head into a schedule you’re playing more than every other day, it’s hard to resolve and refine your issues,” said Nets head coach Steve Nash. “Not to mention the COVID protocols and whatever things that may go on with your team with other injuries or procedures. I think we’re going to see that for a period of time. I’m sure it will resolve itself at some point in the season, but for now we are I think a team, a league that has a lot of teams that are unsettled. They had short camps. They’re straight into a very heavy schedule and very little practice time, and then all the dynamics of COVID and COVID protocols, which are understandable.”</p>
<div class="text-center">
<button type="button" class="btn btn-dark justify-content-center">지금 바로 시작하기 !</button>
</div>
</div>
<div class="row ">
<div class="col-4">
<h2 class="font-weight-bold pt-3">NEWS</h2>
<P class="font-italic">There are many variations of passages of Lorem Ipsum available, but the majority have suffered alteration in some form, by injected humour, or randomised words which don't look even slightly believable. If you are going to use a passage of Lorem Ipsum, you need to be sure there isn't anything embarrassing hidden in the middle of text. All the Lorem Ipsum generators on the Internet tend to repeat predefined chunks as necessary, making this the first true generator on the Internet. It uses a dictionary of over 200 Latin words, combined with a handful of model sentence structures, to generate Lorem Ipsum which looks reasonable.</P>
<div><button type="button" class="btn btn-dark">자세히 보기▸</button></div>
</div>
<div class="col-4">
<h2 class="font-weight-bold pt-3">Topic</h2>
<P class="font-italic">There are many variations of passages of Lorem Ipsum available, but the majority have suffered alteration in some form, by injected humour, or randomised words which don't look even slightly believable. If you are going to use a passage of Lorem Ipsum, you need to be sure there isn't anything embarrassing hidden in the middle of text. All the Lorem Ipsum generators on the Internet tend to repeat predefined chunks as necessary, making this the first true generator on the Internet. It uses a dictionary of over 200 Latin words, combined with a handful of model sentence structures, to generate Lorem Ipsum which looks reasonable.</P>
<div><button type="button" class="btn btn-dark">자세히 보기▸</button></div>
</div>
<div class="col-4">
<h2 class="font-weight-bold pt-3">HOT</h2>
<P class="font-italic">There are many variations of passages of Lorem Ipsum available, but the majority have suffered alteration in some form, by injected humour, or randomised words which don't look even slightly believable. If you are going to use a passage of Lorem Ipsum, you need to be sure there isn't anything embarrassing hidden in the middle of text. All the Lorem Ipsum generators on the Internet tend to repeat predefined chunks as necessary, making this the first true generator on the Internet. It uses a dictionary of over 200 Latin words, combined with a handful of model sentence structures, to generate Lorem Ipsum which looks reasonable.</P>
<div><button type="button" class="btn btn-dark">자세히 보기▸</button></div>
</div>
<div class="col-4 pb-3">
<h2 class="font-weight-bold pt-3">THIS</h2>
<P class="font-italic">There are many variations of passages of Lorem Ipsum available, but the majority have suffered alteration in some form, by injected humour, or randomised words which don't look even slightly believable. If you are going to use a passage of Lorem Ipsum, you need to be sure there isn't anything embarrassing hidden in the middle of text. All the Lorem Ipsum generators on the Internet tend to repeat predefined chunks as necessary, making this the first true generator on the Internet. It uses a dictionary of over 200 Latin words, combined with a handful of model sentence structures, to generate Lorem Ipsum which looks reasonable.</P>
<div><button type="button" class="btn btn-dark">자세히 보기▸</button></div>
</div>
<div class="col-4 pb-3">
<h2 class="font-weight-bold pt-3">IS</h2>
<P class="font-italic">There are many variations of passages of Lorem Ipsum available, but the majority have suffered alteration in some form, by injected humour, or randomised words which don't look even slightly believable. If you are going to use a passage of Lorem Ipsum, you need to be sure there isn't anything embarrassing hidden in the middle of text. All the Lorem Ipsum generators on the Internet tend to repeat predefined chunks as necessary, making this the first true generator on the Internet. It uses a dictionary of over 200 Latin words, combined with a handful of model sentence structures, to generate Lorem Ipsum which looks reasonable.</P>
<div><button type="button" class="btn btn-dark">자세히 보기▸</button></div>
</div>
<div class="col-4 pb-3">
<h2 class="font-weight-bold pt-3">NETS</h2>
<P class="font-italic">There are many variations of passages of Lorem Ipsum available, but the majority have suffered alteration in some form, by injected humour, or randomised words which don't look even slightly believable. If you are going to use a passage of Lorem Ipsum, you need to be sure there isn't anything embarrassing hidden in the middle of text. All the Lorem Ipsum generators on the Internet tend to repeat predefined chunks as necessary, making this the first true generator on the Internet. It uses a dictionary of over 200 Latin words, combined with a handful of model sentence structures, to generate Lorem Ipsum which looks reasonable.</P>
<div><button type="button" class="btn btn-dark">자세히 보기▸</button></div>
</div>
</div>
</div>
<footer class="row">
<div class="col text-right">
<h6 class="text-light bg-dark fatdiv">ⓒ Brooklyn Nets 2021 Powered by imlsw96. All Rights Reserved.</h6>
</div>
</footer>
</div>
<script src="https://code.jquery.com/jquery-3.5.1.slim.min.js" integrity="sha384-DfXdz2htPH0lsSSs5nCTpuj/zy4C+OGpamoFVy38MVBnE+IbbVYUew+OrCXaRkfj" crossorigin="anonymous"></script>
<script src="./js/bootstrap.bundle.min.js"></script>
</body>
</html>
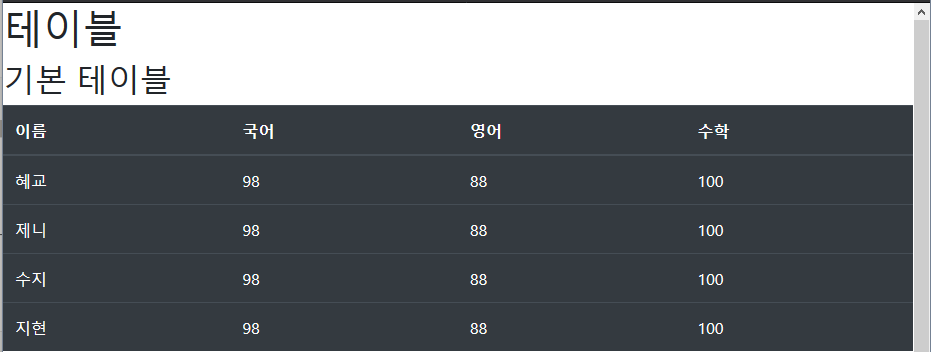
테이블 개념?으로 열과 행을 눈으로 박스로 나눠서 코드 작성하니 훨씬 수월했다.
Bootstrap의 클래스를 이용하니 html, css만으로 작업해야할 부분을 훨씬 수월하게 작업했던 거 같다.